
Now the world is more interconnected and every device like smartphones, cars, fridges, video cameras, watches, and even washing machines can have an active Internet connection. But for being connected all the time and recollect information constantly from sensors or from the device itself, this connection must be lightweight.
In 1999, Andy Standford-Clark and Arlen Nipper wrote the first version of the MQTT (Message Queue Telemetry Transport) protocol which is a publish-subscribe-based messaging protocol that works on the application layer of the TCP/IP or OSI model.
But what about Android?
Well, actually, Android has its own ways to be connected to servers and services, you know: Firebase, FCM, REST, etc. But imagine using a protocol that is lighter, that strongly considered bandwidth and CPU limitations of a mobile device which can be used for connecting with sensors and IoT devices. Here is where MQTT is recommended.
On this article, I will try to show you a little implementation of the MQTT protocol in Android based in my experience.
MQTT Basics
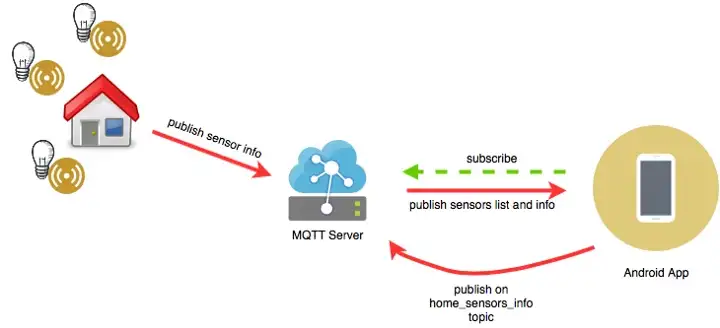
As I previously mention, MQTT is a publish-subscribe-based messaging protocol, this means that clients must subscribe to a specific topic where messages are sent. The MQTT broker (or server) is in charge of managing of sending message to a specific (or specifics) topics and all clients subscribed to it will be receiving the data.
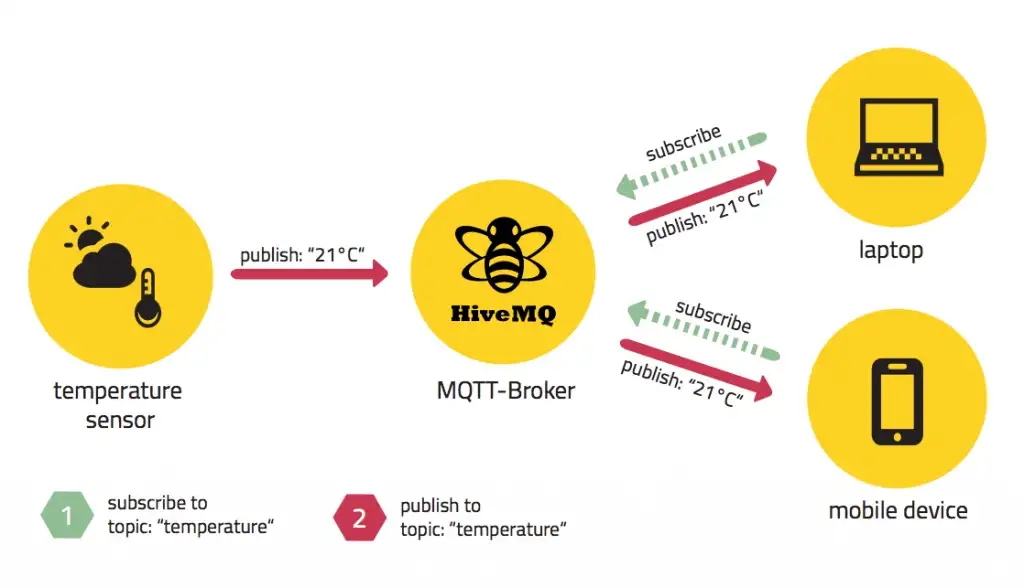
Figure1. MQTT architecture. Image from HiveMQ
But for not increasing this article size, I strongly recommend you to take a look at the MQTT Essentials site from HiveMQ, it has a very well explained definitions for MQTT concepts.
MQTT Essentials
MQTT is the most commonly used messaging protocol for the Internet of Things (IoT). MQTT stands for MQ Telemetry Transport.
www.hivemq.com
Let’s go to Android development
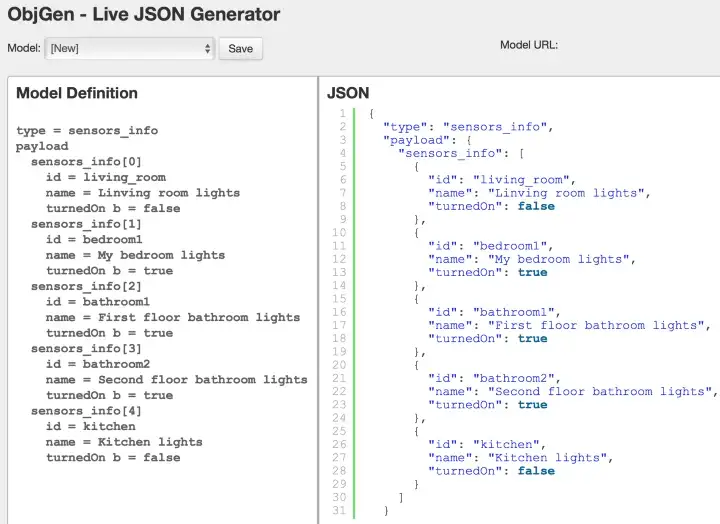
Now imagine you have sensors that will capture if the light is on in every room in your house and also you want to change its state. We are going to be a client subscribed to the “home_lights” topic and we are going to receive all sensors information. Every sensor has its own ID (that obviously must be unique to identify each of them) and will send a single data into the payload object in JSON format, something like this:
{
  "type": "sensors_info",
  "payload": {
    "sensors_info": [
      {
        "id": "living_room",
        "name": "Linving room lights",
        "turnedOn": false
      },
      {
        "id": "bedroom1",
        "name": "My bedroom lights",
        "turnedOn": true
      }
    ]
  }
}
So now we create or Android project and we will use the Paho Android Mqtt Library from Eclipse, which is a set of two libraries that work together: The Java and the Android library itself. At the end of the article, I will share the source code on Github. For this example, HiveMQ provide a free MQTT broker admin site which will be useful for testing our app:
Now start writing code! We have done on adding the Paho dependency to our build.gradle application file and now create a service for having the MQTT Connection alive on background. On this service, we are going to make the connection by creating our own implementation of a MqttAndroidClient. Everytime we open the app, we are going to connect and will ask for temperature of all the sensors and every time that changes we are going to be notified. A use of QOS 0 must be considered for this app since we do not want to receive or send offline messages. Just at most once.
So, we have our LightSensorViewModel that extends from ViewModel class and three main methods there:
| |
· updateSensor: for updating just one item of the list.
· updateSensorsInfo: for updating all the list.
· getSensors: only returns the list, empty at the beginning.
LightSensorViewModel will notify our presenter when the list (or an item on it) is updated.
And a repository that will publish and receive messages from the MQTT Server through an Android service that handles the connection. We have two methods there:
fun updateSensorState(customLightSensor: CustomLightSensor, turnedOn: Boolean){

    val message = MqttMessage()
    val jsonMessage = JSONObject()
    val sensorInfo = JSONObject()

    jsonMessage.put(SensorsMqttService.MQTT_MESSAGE_TYPE, UPDATE_LIGHT_STATE)
    sensorInfo.put("sensor_id", customLightSensor.id)
    sensorInfo.put("isTurnedOn", turnedOn)
    jsonMessage.put("sensor_info", sensorInfo)
    message.qos = 0
    message.payload = jsonMessage.toString().toByteArray()

    // here we ask for home sensors information
    service.publish(SensorsMqttService.TOPICS[2], message)
}
fun getAllSensors(vm: LightSensorViewModel) {
   // we subscribe to sensors topic
   service.subscribeToTopic(SensorsMqttService.TOPICS[1], 0, object:IMqttActionListener{

        override fun onSuccess(asyncActionToken: IMqttToken?) {
            Log.d("Mqtt", "Success subscribing to topic")
        }

        override fun onFailure(asyncActionToken: IMqttToken?, exception: Throwable?) {
            Log.d("Mqtt", "Failure on topic subscription")
        }

    }, IMqttMessageListener { topic, message ->


        val msgObj = JSONObject(message.toString())
        val type = msgObj.getString(SensorsMqttService.MQTT_MESSAGE_TYPE)
        val payload = msgObj.getJSONObject(SensorsMqttService.MQTT_MESSAGE_PAYLOAD)

        when(type){
            "sensors_info" -> {

                val array = payload.getJSONArray("sensors_info")
            vm.updateSensorsInfo(SensorMapper().mapJsonArray(array))

            }

            "update_sensor" -> {

                val obj = JSONObject(message.toString())
             .getJSONObject(SensorsMqttService.MQTT_MESSAGE_PAYLOAD)
             .getJSONObject("sensor_info")
             vm.updateSensor(SensorMapper().mapJson(obj))

            }

       }
    // end of subscribeToTopic method
    })


    val message = MqttMessage()
    val jsonMessage = JSONObject()
    jsonMessage.put(SensorsMqttService.MQTT_MESSAGE_TYPE, GET_SENSORS)

    message.qos = 0
    message.payload = jsonMessage.toString().toByteArray()

    // here we ask for home sensors information
    service.publish(SensorsMqttService.TOPICS[0], message)
}
· updateSensorState: Will send a message to the server for updating the light state: to turning on or off. As you have noticed, we instantiate a MqttMessage object and set the Quality of Service attribute to 0. Moreover, the payload for this MqttMessage will be a String JSONObject. It could be any String but is better to use JSON for having a standardized data-interchange format.
· getAllSensors: This method will subscribe to the topic “home_lights” (see the graphic at the end) and is going to be listening all messages that arrive on it. For receiving messages, we must ‘ask’ to the broker for them, because of this, we send a request with the message type as ‘get_sensors’ to the topic “home_sensors_info”.
Now about the implementation on a service
For handling the connection to the server, a service has been created based on an interface (MqttModel) with the basic methods: connect, disconnect, subscribe and unsubscribe. This has been named SensorsMqttService which that is going to be started a foreground service if application target is API 26 (Oreo).
In addition to creating our SensorsMqttService class and adding it to the AndroidManifest.xml, we will also add an extra service that is started from the MqttAndroidClient class in the Paho library: MqttService. That is, the library is running an Android service called MqttService that is responsible for managing the actions and responses that are given using the protocol.
The connectToServer method will try to connect to the server using a MqttConnectOptions object specifying these basics attributes:
connectionTimeout: defines the maximum time interval (in seconds) the client will wait for the network connection to the MQTT server to be established.
isAutomaticReconnect: sets whether the client will automatically attempt to reconnect to the server if the connection is lost. The value, measured in seconds, to wait for a reconnect attempt is going to increase over the time.
sCleanSession: sets if client and server should remember state across restarts and reconnects. This means, if the value is set to true, messages will not be maintained when a connection lost event occurs and server will treat a subscription as non-durable, client should subscribe to all topics again when reconnect and old messages before the connection broke are not going to be received. If the value is set to false, server will maintain messages and subscriptions when the connection is broken with the client.
keepAliveInterval: defines the maximum time interval (measured in seconds) between messages sent or received. These value is used with an AlarmManager object inside the AlarmPingSender class.
We call the connect method and pass an IMqttActionListener object as the third parameter. This is going to work as a callback for knowing if the connection was success or fails.
The same for the disconnectFromServer method but a difference there is that, when the disconnect event is successful, unregisterResources method from the MqttClient object is called for unregister itself broadcast receiver (the MqttAndroiClient class extends from BroadcasReceiver and implements IMqttAsyncClient for basic operations) and unbinds the MqttService that is running. After this, close is executed for remove all data from the current client and have a clean new connection afterwards.
But how do we use the free MQTT Broker for testing?
First, we simulate a connection as a client. On the server, you should have a client/broker that will listen messages on the “home_sensors_info” topic. That’s why we subscribe to it on this panel.
So, we only have to click on Connect and then the red button is going to turn to red. Notice that the Host URL is used on our Mqtt service implementation but using TCP and the 1883 port.
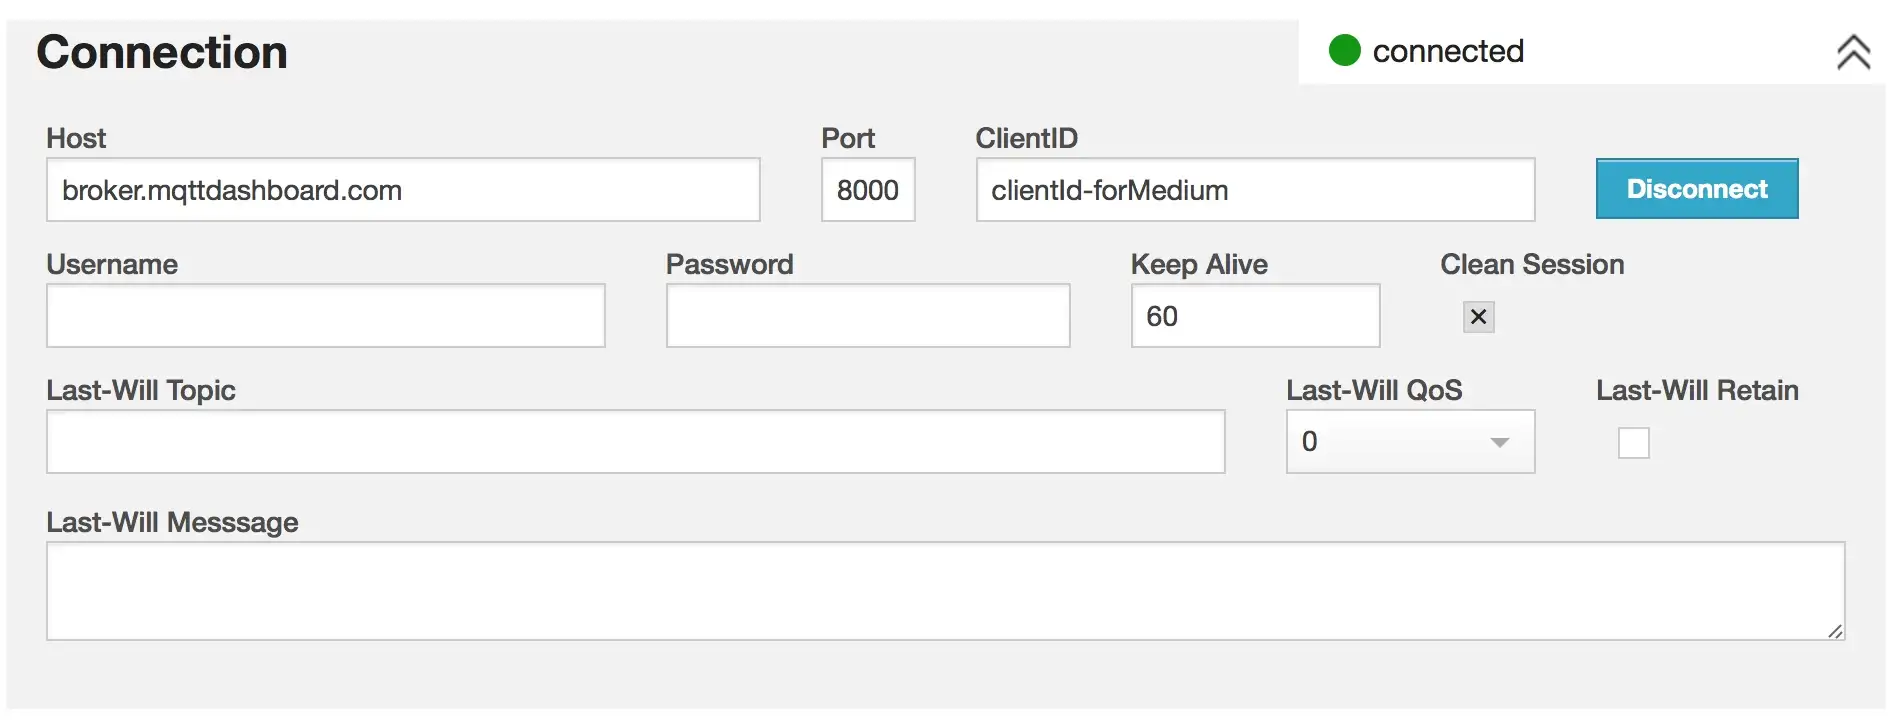
Figure 2. Connect section.
An add a new topic subscription to “home_sensors_info”.

Figure 3. Subscription section.
When the application starts, it will connect and publish to that topic for ‘asking’ about sensors information. We are going to notice that the message from the Android application is going to arrive because we are subscribed to the corresponding topic.

Figure 4. Messages section.
And for simulate sending the lists of sensors with their information, we use the Publish section. We are going to put the information in JSON format.
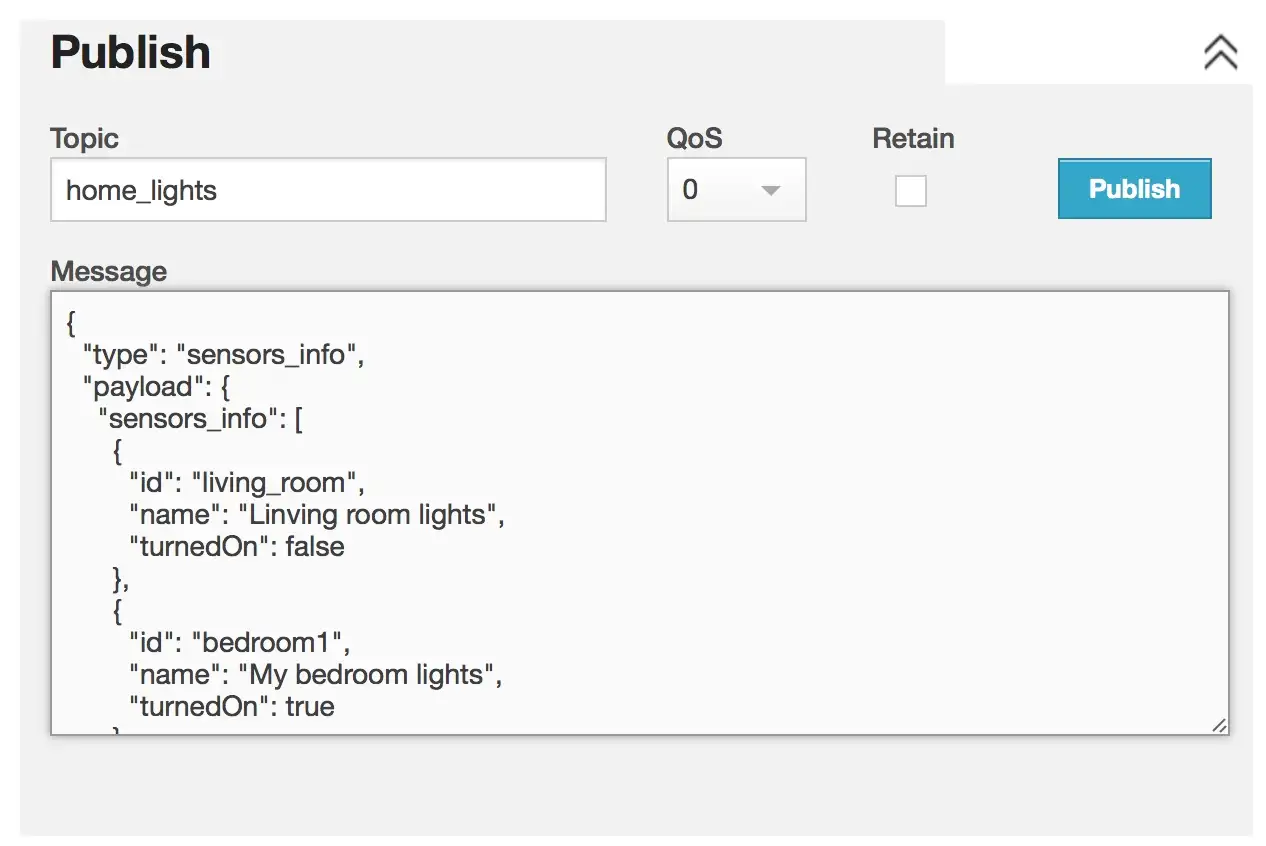
Figure 5. Publish section.
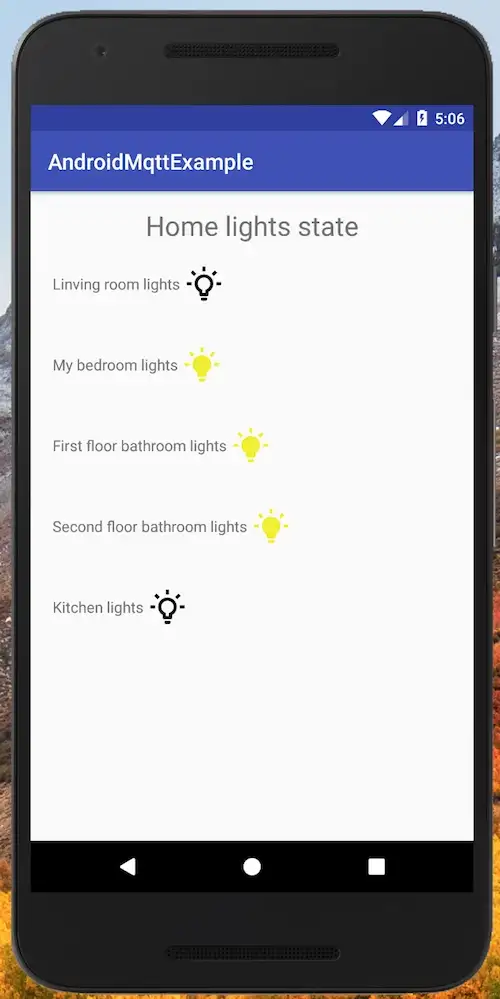
Figure 6. The application showing the list of light sensors and their state.
When we click on a sensor light item for changing its state, we send a message to the topic “home_sensors_info” with a message type “UPDATE_LIGHT_STATE”. In this example, we click on the bedroom light that is turned on, so we set the value to off (isTurnedOn as false).
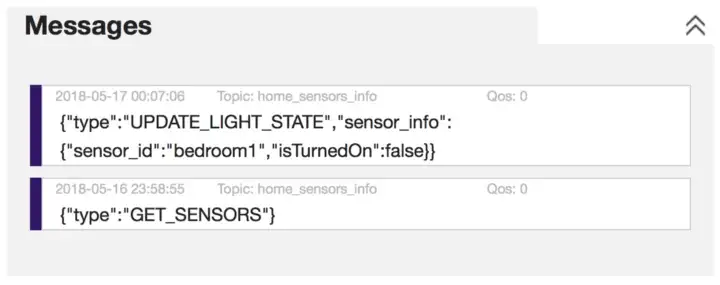
Figure 7. When app changes a light sensor state.
And now we simulate the response from the server to change the application UI.
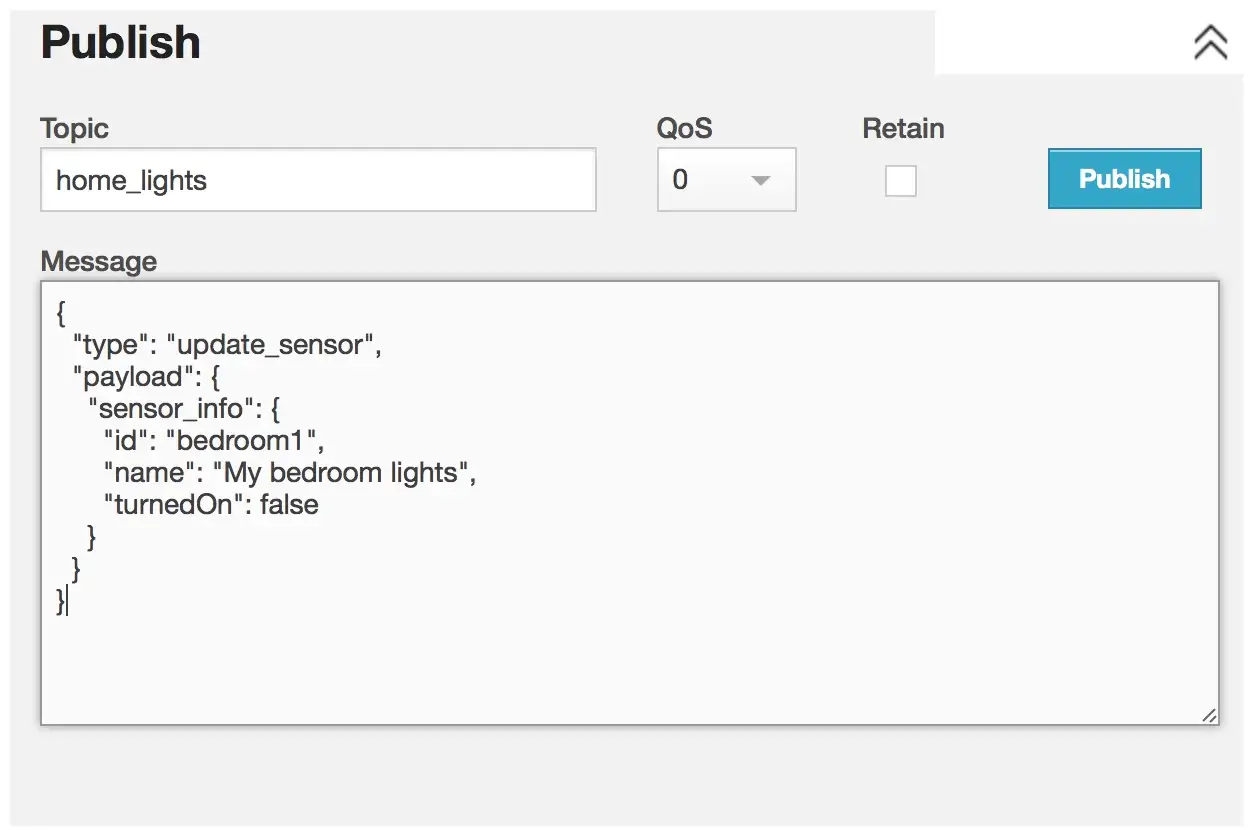
Figure 8. Simulating the update light sensor state message from the MQTT broker.
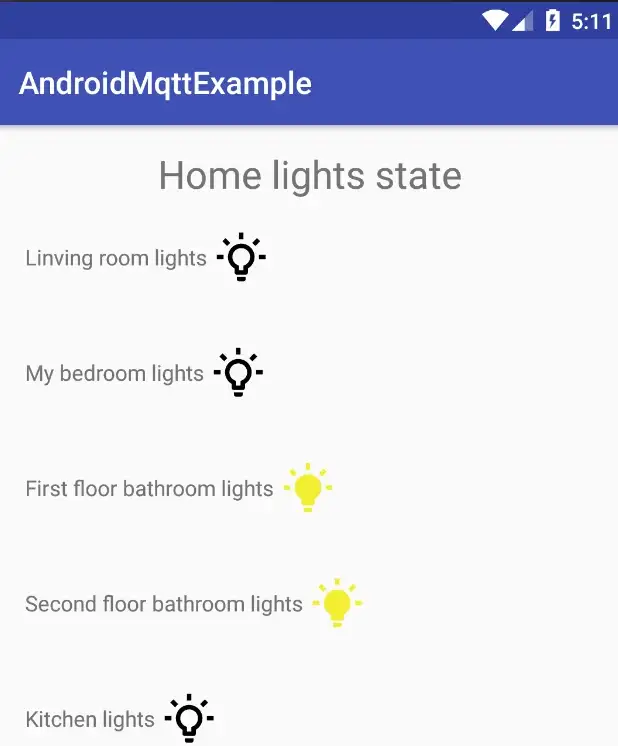
Figure 9. The bedroom light has been turned off.
For generating the JSON structured, I used ObjGen:

Finally, the basic ecosystem architecture:
The project is hosted on Github!
jflavio11/MQTTAndroidExample
MqttAndroidExample - An Example Android app using MQTT protocol
www.hivemq.com

Useful links
· MQTT Essentials (HiveMQ) — https://www.hivemq.com/mqtt-essentials/
· HiveMQT Free MQTT Broker — http://www.hivemq.com/demos/websocket-client/
· ObjGen Live JSON Generator — http://www.objgen.com/json